A backyard fire pit transforms an ordinary patio into a year-round gathering spot. Whether you want a simple ring of stones for weekend marshmallow roasts or a polished gas-burning centerpiece for dinner parties, the project is well within reach for most homeowners. Costs range from about $200 for a basic DIY build to $3,000 or more for a professionally installed custom design.
This guide walks through the main types of fire pits, which materials work best, placement and safety codes, a step-by-step build process, and rough budgets so you can pick the right approach for your yard.
Types of Backyard Fire Pits
Fire pits fall into a few broad categories, and the best choice depends on how you plan to use it, your local codes, and how much maintenance you're willing to handle.
In-Ground Fire Pits
These sit flush with the surrounding ground or slightly below grade. You dig a hole, line it with fire-rated materials, and add a gravel drainage layer underneath. In-ground pits look clean and natural, blend well with flagstone patios, and feel less obtrusive in smaller yards. The trade-off: drainage can be tricky if your soil doesn't drain well, and they're harder to relocate once built.
Above-Ground Fire Pits
The most popular DIY option. You stack retaining wall blocks, fire bricks, or natural stone into a ring on a flat, fireproof surface. Assembly takes a few hours. Above-ground pits are easy to build, offer good airflow, and can be dismantled if you move. Most of the kits you'll find at Home Depot or Lowe's fall into this category.
Wood-Burning vs. Gas
Wood-burning pits deliver the crackling ambiance and smoky scent that many homeowners want. Gas fire pits — connected to a natural gas line or fueled by a propane tank — start with a switch, produce no smoke, and shut off instantly. Gas models cost more upfront (typically $800 to $3,500 installed) but burn cleaner and face fewer restrictions in areas with air-quality regulations.
Portable Fire Pits
Steel bowls, copper basins, and tabletop models require zero construction. They're a solid option if you rent, have a small deck, or want to test the concept before committing to a permanent build. Expect to spend $100 to $500 for a quality portable unit from brands like Solo Stove, Breeo, or Blue Sky Outdoor Living.
Choosing the Right Materials
Material choice affects appearance, durability, heat retention, and cost. Here are the most common options.
Retaining Wall Blocks
Concrete retaining wall blocks are the go-to for DIY fire pit kits. They're uniform in size, stack neatly without mortar, and cost around $2 to $6 per block. A standard 36-inch-diameter pit uses roughly 36 to 40 blocks. Stick with blocks rated for high heat — standard landscaping blocks can crack or spall when exposed to direct flame over time.
Fire Brick
Fire brick (also called refractory brick) is engineered to withstand temperatures above 1,800 degrees Fahrenheit. Use fire brick for the inner lining of any wood-burning pit, even if the outer shell is a different material. A single fire brick runs about $2 to $4 at most building supply stores.
Natural Stone
Fieldstone, bluestone, and granite give a fire pit a rugged, organic look. Natural stone is heavier and less uniform than manufactured blocks, so building with it takes more time and sometimes mortar. Avoid river rocks and other stones pulled from wet environments — trapped moisture can cause them to crack violently when heated.
Steel and Corten Steel
Steel fire rings and bowls are popular for modern and industrial-style patios. Corten (weathering) steel develops a rust-colored patina over time that many homeowners find attractive. A 36-inch steel ring insert costs $50 to $150 and fits inside a stone or block surround to protect the masonry.
Sizing, Placement and Setback Rules
Getting placement right is critical — both for safety and for staying on the right side of local codes.
How Big Should Your Fire Pit Be?
Most backyard fire pits range from 36 to 44 inches in outer diameter, with an inner burn area of 24 to 36 inches. That size comfortably seats six to eight people around the perimeter with room for chairs. Anything larger than 48 inches starts to feel commercial-scale and may trigger stricter code requirements.
Setback and Clearance
A safe minimum is 10 feet from any structure, fence, overhang, or property line. Many jurisdictions require 15 to 25 feet. Check your local fire code before you pour gravel — a quick call to your city's fire marshal office usually gets you a definitive answer in minutes.
Also look up:
- HOA restrictions — some homeowners associations ban open flames entirely
- Burn bans — common in drought-prone areas of the West and Southwest
- Underground utilities — always call 811 before digging
- Overhead clearance — no tree branches within 10 feet above the pit
Do You Need a Permit?
It depends on where you live. Many cities and counties exempt small, portable fire pits from permitting. Permanent, in-ground, or gas-connected pits often require a permit — especially if a gas line is involved. Permit fees typically run $50 to $200. Skipping the permit can lead to fines and complications when you sell the house.
Step-by-Step: Building an Above-Ground Fire Pit
This walkthrough covers a basic 36-inch-diameter above-ground pit using retaining wall blocks. Plan for about four to six hours of work.
Tools and Materials
- 36-40 retaining wall blocks (fire-rated)
- Fire brick for inner lining (optional but recommended)
- Steel fire ring insert (36-inch)
- Gravel (about 0.5 cubic yards)
- Construction adhesive (fire-rated)
- Shovel, level, tape measure, rubber mallet
- Tamper or hand compactor
- Spray paint for marking
Step 1: Mark the Location
Drive a stake into the center of your chosen spot. Tie a string to the stake, measure out 18 inches (half the diameter), and use spray paint to trace a circle on the ground. Step back and check the position from your house, patio, and seating area before committing.
Step 2: Excavate
Dig out the circle to a depth of about 6 inches. Remove any grass, roots, and loose soil. The bottom should be fairly level — use a hand tamper to compact the exposed earth.
Step 3: Add a Gravel Base
Pour 3 to 4 inches of crushed gravel into the hole and tamp it down firmly. The gravel serves two purposes: drainage and a stable, level foundation for the blocks. Check with a level across the surface in multiple directions.
Step 4: Lay the First Course
Arrange the first ring of blocks on top of the gravel, lip-side down and touching edge to edge. Use a level after every two or three blocks. Tap blocks into position with a rubber mallet. This first course is the foundation for everything above it, so take your time here.
Step 5: Stack Additional Courses
Apply a bead of fire-rated construction adhesive on top of the first course, then place the second row with staggered joints (like a brick wall). Most fire pits use two to three courses for a finished height of 12 to 18 inches. Two courses is enough for a casual seating-height pit; three courses work better if you want a wider cap for resting drinks.
Step 6: Install the Fire Ring
Drop the steel fire ring into the center of the block surround. It should sit snugly inside the inner diameter. The ring protects the blocks from direct flame contact and extends the life of the pit significantly.
Step 7: Add the Cap (Optional)
Flat capstones or matching wall caps on the top course give the pit a finished look and a comfortable ledge for seating or setting plates. Secure caps with construction adhesive. Let the adhesive cure for 24 hours before lighting a fire.
Costs: DIY vs. Professional
Here's a rough breakdown of what you can expect to spend.
DIY Budget (Wood-Burning)
- Retaining wall blocks: $70 - $240
- Fire brick lining: $40 - $80
- Steel ring insert: $50 - $150
- Gravel: $20 - $40
- Adhesive, tools, miscellaneous: $20 - $50
- Total: $200 - $560
DIY Budget (Gas)
- Gas burner kit with pan: $200 - $600
- Stone or block surround: $100 - $300
- Propane tank or gas line connection (pro install recommended): $200 - $500
- Total: $500 - $1,400
Professional Installation
A contractor-built fire pit with natural stone, a gas burner, and integrated seating typically runs $3,000 to $6,000. High-end designs with custom masonry, fire glass, and landscape lighting can push past $10,000.
Safety Tips
A fire pit is only as safe as the habits around it.
- Keep a garden hose or fire extinguisher within reach every time you light a fire
- Use a spark screen on wood-burning pits to contain embers
- Never burn treated lumber, plywood, or trash — they release toxic fumes
- Supervise children and pets around an active fire at all times
- Let ashes cool completely (at least 24 hours) before disposal
- Avoid lighting a fire on windy days — gusts above 15 mph make open flames unpredictable
- Don't use accelerants like gasoline or lighter fluid to start a fire pit fire
Design Ideas Worth Stealing
Sunken Conversation Pit
Dig out a larger area around the fire pit and add built-in stone bench seating at a lower level than the surrounding yard. This creates a cozy, sheltered gathering spot that feels private even in an open backyard.
Fire Pit and Paver Patio Combo
Build the fire pit at the center of a circular paver patio. Use a contrasting paver color for the ring around the pit to create a visual focal point. This approach works especially well when the rest of the yard is grass — the patio defines the entertainment zone clearly.
Modern Rectangular Fire Table
A long, rectangular gas fire table doubles as an outdoor dining centerpiece. Pair it with weather-resistant seating and you've got an outdoor living room that works from April through November in most of the country.
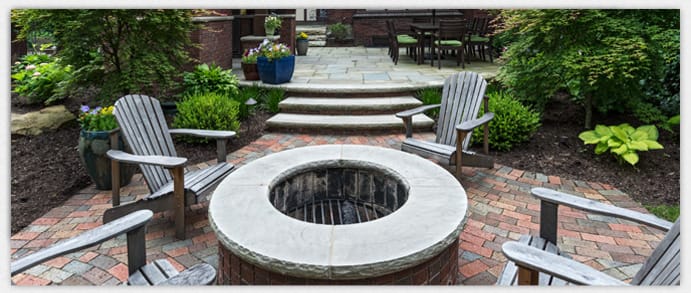
Rustic Stone and Adirondack Setup
A dry-stacked fieldstone pit surrounded by Adirondack chairs is the classic American backyard look. Add string lights overhead and a firewood rack nearby, and the setup practically invites people to sit down and stay a while.
A backyard fire pit is one of those rare home projects that costs relatively little, takes a single weekend, and genuinely changes how you use your outdoor space. Start with the basics — a flat spot, the right materials, and a respect for local codes — and you'll have a feature the whole household gravitates toward for years.